

So let's get right into it.
Here's what you'll need:
The Materials:

The Tools:

Additionally, if you plan on hand-monogramming from a stencil, you'll need a paintbrush/sponge, a cutting blade, freezer paper, and paint (I used an acrylic base with a layer of puff paint over it), iron, and a printer (optional).

Notes and Warnings:
You'll probably end up burning your fingers during some point on hot glue. Just accept it. Keep some mustard handy in case you actually get burnt decently (I only got one that actually caused a welt--the rest were quickly forgotten). Also, FEATHERS AND HOT GLUE STRINGS EVERYWHERE. No matter what you do, you can't keep those feathers and strings from the hot glue under control. So don't bother. You'll probably find some on you weeks later. You'll blow your nose six days later and there'll be pink feathers chillin' there in your tissue. Just wait till you're finished and then vacuum everything that you can.
Alrighty, let's get started.
Step 1: (Prep) Making a Pattern >> The easiest way to start out, at least if you're making multiples, is to make a pattern. Use your tape measure to get the circumference and height of your koozie, and then translate and mark that onto your cardboard. Horizontally, you'll want some overlap, as well as a bit of extra room to fold the fabric and make a seam, so give yourself an extra 1.5in or so. Your height depends on whether or not you want material around the top edge of your koozie.

(<--Material around top)
(No material around top-->)
If you want material around the top, then only give yourself .75in-1in extra material. If you don't want any, do about 2in (because you'll be folding it over).
Once you've got your measurements worked out, cut out your cardboard. This'll serve as your pattern for the rest of the time. If you plan on putting material around the top, you'll also need to cut out a pattern to match the top.

If you want to cut out a pattern for your felt, you can; however, I just found that it was easier to trace a household object every time (I used a tub of conditioner).
Step 2: (Prep) Making Your Stencil >> If you plan on hand-monogramming and doing initials/name/date personalized, it'll probably be easier for you to go ahead and make your stencil (if you are just doing iron-on letters or something, skip this step).
Grab some freezer paper and cut it into an 8.5x11 sheet (or whatever you want to fit in your printer). In a word or art program, come up with your design. If you have a laser jet-type printer, you can print directly on your freezer paper (make sure it prints on the non-glossy side); otherwise, just trace it onto some freezer paper.


Once it's printed, cut out your letters using your blade. What remains will be your stencil.
Step 3: Cutting your fabric >> Once you've got your patterns cut out, start cutting out your fabric!


If you're doing material around the top, when you cut
your pattern, leave excess material on both sides,
approximately 1cm on the inside, and 1.5cm around the
outside. You need extra because you'll be folding these.
your pattern, leave excess material on both sides,
approximately 1cm on the inside, and 1.5cm around the
outside. You need extra because you'll be folding these.
Step 4: Monogramming >> *Note: You can do the monogramming later, after you've glued the material onto the koozie, or do it now. It's your choice. There's more waiting around if you do it now, but it's a little easier* Now that you've got your fabric, go ahead and glue and fold one edge (left or right) of the material. It doesn't need to be big, maybe just a cm or so. The purpose of this is to create a seam that will prevent the fabric from unraveling, which it would do if you didn't seal it in this manner.

If you're not putting material around the top, you'll need to repeat this process on the top edge of your fabric, so that you wind up with a fold around the top, like in this picture.


If you're not putting material around the top, you'll need to repeat this process on the top edge of your fabric, so that you wind up with a fold around the top, like in this picture.

Wrap, but don't glue, the fabric around the koozie. The part where you've made the seam should overlap the other edge. On the opposite side of the seam is where you should mark a spot to center your monogram. Make it a little lower to the bottom, because the feathers will cause the visible center to shift down.
Now take your iron and heat it to around medium heat (probably something like cotton blends). When it's heated, center your stencil on the fabric and iron it down. Just run over it enough to get it to lightly stick down--don't overdo it or the sticky part will stay stuck on the fabric when you pull it off. *Note: if you're doing iron-on premades, this would be the time to do them--just follow the instructions*
Put your fabric and stencil on cardboard or something so the paint won't bleed through onto your surface and then paint over your stencil using whichever paint you like. I ended up doing an acrylic pink base (two coats), then topped it off with a clear-ish glitter puff paint. You can go ahead and pull your stencil up now, or wait until it's completely dry. Your choice. Either way, don't move on to the next step until they're dry.

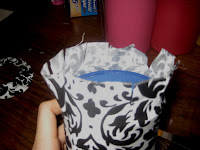
Step 5: Decorating the Koozie >> And finally we're actually working on the koozie. Grab your hot glue gun and get ready. First, you'll want to attach the main piece of fabric. Start on the edge that you haven't already folded and glued! On the non-glued edge, put down a vertical line of glue close to the edge, then put your koozie into the glue to bond them. The top of the fabric should be flush with the top of the koozie. Try to smooth out the glued edge as best you can.
From here, just roll the koozie up in the fabric, adding an occasional small horizontal line of glue close to the top edge (while keeping the tops even with each other)


Once you reach the folded edge, add a vertical line of glue to this edge, then roll the koozie into this glue to attach the fabric all the way.
Now flip the koozie over. See all that overhanging fabric? Cut little slits into it about 2cm apart, making little tabs. Don't go all the way to the bottom edge of the koozie, but stick pretty close.
Now it's time for more gluing! Yay!

Put down some glue, then pull the tabs taut and press them down flat, gluing them. You'll probably burn your fingers in this part. Especially if you're impatient like me and you just put down a ton of glue at once so that you can do 5 or 6 tabs at a time. You'll wind up with a windmill-looking thing on the bottom.

I think it actually looks kinda cool. Alas, we're going to be covering it up. That's right, time for some felt!

If you haven't already, cut out some felt for the bottom. I made mine a little smaller than the koozie, but that's a matter of personal preference. Don't forget to cut a little hole in the center.

Just glue that sucker down, and you've got a nice, relatively even, non-unraveling bottom. Lovely.
Step 6: Continuing the Decorations~ Adding material to the top >> *Note: this step is only if you want material around the top. If you don't, skip to the next step* Alright, so this is probably the most tedious step in the whole process, although it really isn't that bad. Well, you'll probably end up burning yourself a little again, but whatevs. Don't be a baby.
At this point, you should have a circle of fabric to match your top (with extra fabric on either side) cut out. Because I told you to do that in Step 1. Take this fabric, and cut little tabs in it, like how we did in the previous step (the tabs allow us to keep it circular and minimize any folds, lumps, and bumps where we don't want them).
Now flip it over (so that the backside of the fabric is facing up) and start gluing each tab to the main circle. It's okay if you go over the outer edge of the circle, but make sure the inside edge stays true to your line.


You'll wind up with a little "skirt" flaring out. Our next step? You guessed it--glue it down!

It's okay if you wind up with some bumps and whatnot here, because this'll be covered by feathers soon.
Step 7: Feathers! Feathers Everywhere! >> Grab your boa and start gluing!! Don't put the glue right at the top, do it about a half an inch down. That way, the feathers won't be attacking your mouth if you're drinking from a can. Yum. Tastes crafty.


And you're done!! ....unless you're like me the first couple times and waited to monogram until now. In which case...
Step 8: Monogramming (Version Deux) >> Just grab that stencil and iron from Step 4 and get to work. Iron on the stencil, then paint over it.


I would recommend not doing what I did, which is just dumping a ton of paint on at one time as opposed to doing it in coats. I'm impatient, as is evident by the giant globs in the 2nd picture. As you can see from the third picture, doing this nearly made me ruin it when it started to run. But everything turned out okay in the end!
And we're done! For real this time! Here's a pyramid of some of my finished products! I made a set of 6 for myself, and then one each for my sister and two of my friends (everybody gets their own font!).

Now take your iron and heat it to around medium heat (probably something like cotton blends). When it's heated, center your stencil on the fabric and iron it down. Just run over it enough to get it to lightly stick down--don't overdo it or the sticky part will stay stuck on the fabric when you pull it off. *Note: if you're doing iron-on premades, this would be the time to do them--just follow the instructions*
Put your fabric and stencil on cardboard or something so the paint won't bleed through onto your surface and then paint over your stencil using whichever paint you like. I ended up doing an acrylic pink base (two coats), then topped it off with a clear-ish glitter puff paint. You can go ahead and pull your stencil up now, or wait until it's completely dry. Your choice. Either way, don't move on to the next step until they're dry.

Step 5: Decorating the Koozie >> And finally we're actually working on the koozie. Grab your hot glue gun and get ready. First, you'll want to attach the main piece of fabric. Start on the edge that you haven't already folded and glued! On the non-glued edge, put down a vertical line of glue close to the edge, then put your koozie into the glue to bond them. The top of the fabric should be flush with the top of the koozie. Try to smooth out the glued edge as best you can.
From here, just roll the koozie up in the fabric, adding an occasional small horizontal line of glue close to the top edge (while keeping the tops even with each other)


Once you reach the folded edge, add a vertical line of glue to this edge, then roll the koozie into this glue to attach the fabric all the way.
Now flip the koozie over. See all that overhanging fabric? Cut little slits into it about 2cm apart, making little tabs. Don't go all the way to the bottom edge of the koozie, but stick pretty close.

Now it's time for more gluing! Yay!

Put down some glue, then pull the tabs taut and press them down flat, gluing them. You'll probably burn your fingers in this part. Especially if you're impatient like me and you just put down a ton of glue at once so that you can do 5 or 6 tabs at a time. You'll wind up with a windmill-looking thing on the bottom.

I think it actually looks kinda cool. Alas, we're going to be covering it up. That's right, time for some felt!

If you haven't already, cut out some felt for the bottom. I made mine a little smaller than the koozie, but that's a matter of personal preference. Don't forget to cut a little hole in the center.

Just glue that sucker down, and you've got a nice, relatively even, non-unraveling bottom. Lovely.
Step 6: Continuing the Decorations~ Adding material to the top >> *Note: this step is only if you want material around the top. If you don't, skip to the next step* Alright, so this is probably the most tedious step in the whole process, although it really isn't that bad. Well, you'll probably end up burning yourself a little again, but whatevs. Don't be a baby.
At this point, you should have a circle of fabric to match your top (with extra fabric on either side) cut out. Because I told you to do that in Step 1. Take this fabric, and cut little tabs in it, like how we did in the previous step (the tabs allow us to keep it circular and minimize any folds, lumps, and bumps where we don't want them).
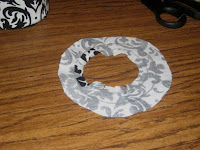
Now flip it over (so that the backside of the fabric is facing up) and start gluing each tab to the main circle. It's okay if you go over the outer edge of the circle, but make sure the inside edge stays true to your line.


You should wind up with something like what is pictured above. Take this ring, and start gluing it to the top of the koozie.


You'll wind up with a little "skirt" flaring out. Our next step? You guessed it--glue it down!

It's okay if you wind up with some bumps and whatnot here, because this'll be covered by feathers soon.
Step 7: Feathers! Feathers Everywhere! >> Grab your boa and start gluing!! Don't put the glue right at the top, do it about a half an inch down. That way, the feathers won't be attacking your mouth if you're drinking from a can. Yum. Tastes crafty.


And you're done!! ....unless you're like me the first couple times and waited to monogram until now. In which case...
Step 8: Monogramming (Version Deux) >> Just grab that stencil and iron from Step 4 and get to work. Iron on the stencil, then paint over it.


I would recommend not doing what I did, which is just dumping a ton of paint on at one time as opposed to doing it in coats. I'm impatient, as is evident by the giant globs in the 2nd picture. As you can see from the third picture, doing this nearly made me ruin it when it started to run. But everything turned out okay in the end!
And we're done! For real this time! Here's a pyramid of some of my finished products! I made a set of 6 for myself, and then one each for my sister and two of my friends (everybody gets their own font!).
No comments:
Post a Comment